Phase 2: Kinect Depth Images to Minecraft Animation
By: Nathan Viniconis
1/11/2010-1/20/2010
Goal
Take a sequence of snapshots from a Kinect and transform them into a stop motion animation within Minecraft. This is the second phase of the Minecraft-Kinect integration project.
Breakdown
Take quick successive kinect snapshots
How to set the stage
Lowering the world
Anchoring the data
Setting the POV
Automate the world-building process of each frame
Create a stop-motion animation
Phase 1: Kinect Depth Image to Minecraft Save
By: Nathan Viniconis
12/26/2010-1/9/2010
Goal
Take a snapshot from a Kinect and transform it into a MineCraft save file. The Depth and Color information will be used to approximate the position and types of blocks to best represent the 3D point cloud in MineCraft.
Breakdown
Rough development information (browse at your own risk):
Get color and depth Kinect data saved as files.
Open up a minecraft world save file
Determine orientation of save so a world render will show the image
Add color data to each rendered block
- Youtube video:
 ->
->
 ->
->
 ->
->
- getSnapshot.py
- This script has been modified to take very quick successive snapshots. To take them quickly as possible, they are all stored in memory and dumped at the end. If you try to take too many, your PC may get upset…
- Dependencies:
- Python 2.5 or higher
- Python Imaging Library (PIL)
- The Kinect must be connected to the PC, and the drivers from http://codelaboratories.com/forums/viewthread/442/ must be installed
- Note: Put the CLNUIDevice.dll in the same directory of the scripts, or the System32 directory, in order for it to work properly!
- The Script:
- Global Variables:
- colorImageName: The base name of the color images
- depthImageName: The base name of the depth images
- saveDir: The base directory to save the images into
- colorDir: The sub-directory to save the color images too
- depthDir: The sub-directory to save the depth images too
- These were split off so opening the min Vdub was easier…
- numImages:
- the number of images to take. 30 per second if all is well.
- startWait: The number of seconds to countDown before actually taking the images.
- Try to make sure it’s at least 2!
- imageWait: How long to wait between each image. Set to 0 for 30FPS
- ProcessImages.py
- This script takes a color and depth image from getSnapshot.py and pushes them into a minecraft save.
- When testing, set testEdit to True. This will prevent the save from happening, and the mapImage.png file can be checked for results.
- Dependencies:
- Images from getSnapshot.py
- Python 2.5 or higher
- NBT parser from https://github.com/twoolie/NBT
- MineCraft
- PIL and numpy Python libraries
- The Script:
- Global Variables:
- Verbose: Set to true to show logging on the console
- testEdit: When true, nothing is actually saved to the minecraft save. Instead, an image “mapImage.png” is created to show a cutout of what will be saved projected in 2D
- colorMatch: When true, the various colors of the 3D image are mapped. Currently uses a manhatten distance RGB algorithm.
- If false, will create statues out of randomized smooth stone, cobblestone, and mossy cobblestone
- storeOldChunks: True if the pre-edited chunks should be pushed to a zip file so they can be restored afterwards
- ImageNames: the depth and color image from getSnapshot.py that will be processed
- pathToSaves: The absolute path to the minecraft save file
- minmaxDepth: This can be toggled to exclude regions outside these bounds. The background walls, or close static can be removed by toggling these values.
- blocksPerMeter: When set to 100, each block will represent 1cm^3. Can toggle this to shrink or grow models.
- floorBlock: The “ground” of the structures. If you lower the world, be sure to lower this from 63
- markCenter: A test attribute that will put a glass tower wherever the projection will be centered.
- markCorners: A test attribute that places colums at the boundaries of the chunks
- centerChunksX,Z: The projection is centered around the X:0, Z:0 corner of this chunk
- Note: All the modified chunks must exist prior to the save
- PossibleBlocks: A list of all the blocks that can be color matched. The name, ID, and associated RGB values that represent the block. Current values were chosen by sampling the various textures from terrain.png
- restoreWorld.py
- A helper script that takes a zip file with pre-edited chunks in it created by processImages.py and loads them back into the world. This effectively ‘clears’ the last edit if used properly.
- The Script:
- Variables:
- worldPath: The path to the save file
- savedZipName: The name of the zip file that has the pre-edited files inside it
- driveAnimation.py
- Drives a windows machine to automatically process the many frames of data captured from getSnapshot.py. Since it can capture up to 30 frames a second, a way to automate:
- processing a depth/color image into a statue.. navigate to the MineCraft process, drive clicks to open the target world, position the player, take a screenshot, close out of the world, and then restore the world back to its previous state.
- Make sure Minecraft is open on the main menu before running the script, or the handle will not be able to be found!
- The Script:
- Dependencies:
- Windows (sorry!). Specifically, pyWin32 libraries
- restoreWorld.py and processImages.py set up correctly
- PIL, numpy, nbt, and images from getSnapshot.py
- Variables:
- worldNum: The number of the world which is going to be opened for the image grab. 1-5
- pathToSaves: The path (minus the number of the world) to the Minecraft save files
- frameDir: The directory where the frames will be saved
- colorDir: The sub-directory of frameDir where the RGB color images will be
- depthDir: The sub-direcotry of framedir where the Depth images will be
- justPic: True if we’re not processing anything, just opening a minecraft world and taking a screenshot
- animateScale: True if we’re taking one image and applying many scales to it, rather than go through many images
- animateFrame: If animateScale is true, this is the path to the images that are being scaled
- scaleMin/Max: The spread of the scales that will be applied
- blocksPerMeter: The scale that is applied to the current render
- worldStartTime: Every time an image is processed, it resets the Minecraft time.
- winSize: The size that the Minecraft window will be forced too
- winBbox: The bounding box of the image to grab
- lowerWorld.py
- An optional script that takes a world and lowers it by a set number. Any blocks removed from the bottom vanish entirely, and air fills in the gap from the top.
- Dependencies:
- NBT parser from https://github.com/twoolie/NBT
- MineCraft
- Numpy Python libraries
- The Script:
- Variables:
- Verbose: Set to true to see status output to the screen
- pathToWorld: Set this to the directory of the minecraft save
- numBlocksToLowerWorld: The amount of blocks that the world should be lowered. Note that lowering it more than 63(sealevel) will cause a very dangerous place!
- testCode: True if the save does not actually occurr, but the codepaths are all executed
Take quick successive Kinect snapshots
- Initial Test
- After an initial wait of 5 seconds, 100 images will be captured as quickly as possible with the FPS calculated.
- Initial attempt came out with a 6.6 FPS at the quickest. This is with all the image saving ocurring in-line
- Second attempt came out to 6.5 FPS.
- Third attempt came out to 6.6 FPS.
- 6.6 FPS is not quick enough for a decent stop action. Minimally, 8FPS is desired.
- Quicken the framerate
- Since the kinect drivers are supposed to be grabbing the data at 30FPS, figure out what is slowing down the code
- The image data is extracted, then the images are saved to disk (SSD!) and then the next image is captured.
- Change this to save the buffers for every image in memory, and then dump those images to file after all images are captures
- Will use WAY more memory, but meh..
- Make sure to do this before EndKinect() as the drivers are unstable and it may freeze without returning and losing the images would be bad
- With the changes, 29-30 FPS has been achieved!
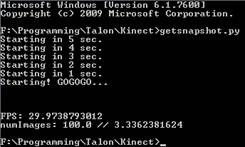
- Very happy with the speed. Go Kinect!
- Updating color algorithm
- 15 new colors for wool were added. Red wood and Birch may also make useful blocks for color
- Assuming these are the 0-15 values of ‘Data’ for a wool block, but not sure. Create a script to add wool, and change the data element to differing values
- The new terrain.png is:
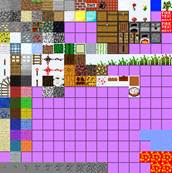 note the wool->
- 15 colors which are set by changing the 4 bit “Data” element.
- Get a representitive RGB for each of the blocks, and add them to the RGB list
- Take out pink as it’s annoying and doesn’t look good
- Create a heuristic to check and see if a color should be grayscale.
- If the average of the RGB is close to all 3 components of the RGB, then force it to choose from the grayscale. This should get rid of the light/dark colored blocks from mixing in with the grayscale ones. The false positives should be minor since they were close to a gray anyway. (wound up removing this)
- What already exists?
- Velentin created an Image->Schematic program in C, his code has been released and is at:
- http://0au.de/hg/mcstruct/
- Try to figure out his color matching algorithm, as his results are awesome
- He is using magick/api.h which does it for him.. look for a python equiv
- Python-Colormath looks like it may do the trick, already have all the dependents installed
- Another possiblity is the equations from EasyRGB. They have equations mapped out to do RGB->XYZ->CIE-L*ab, which would yield great euclidean distances for color matching applications.
- Plan to finish up color matching for good:
- Check the representitive RGB values to better repsresent their shrunken color values
- Apply Python-Colormath for the RGB->CIE-L*ab conversion and difference calculations.
- Installed setupTools so easy_install.exe of python-colormath can be applied
- Import representitive colors from mcstruct into my file
- Minecraft block IDs at: http://www.minecraftwiki.net/wiki/Data_values
- The colors look marginally better, will keep this setup for now
 ->
->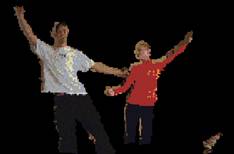
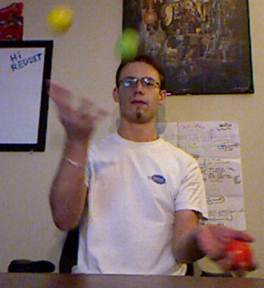
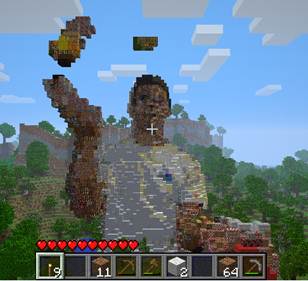
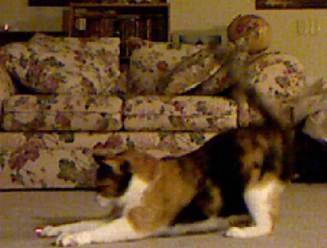
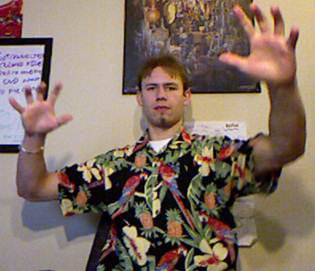
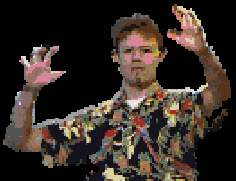
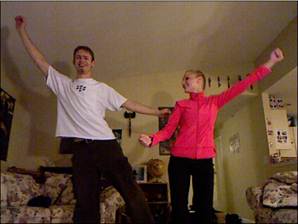
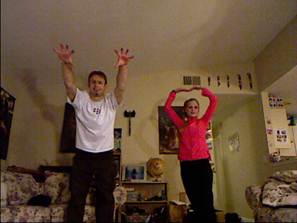
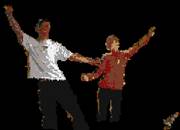
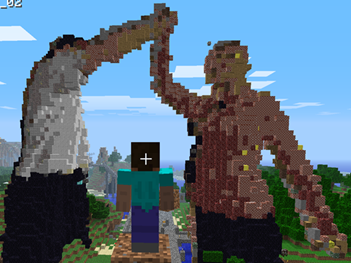
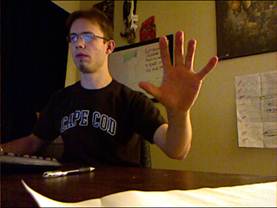
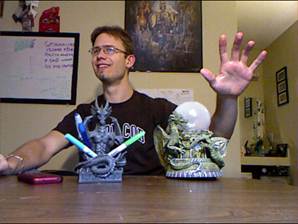
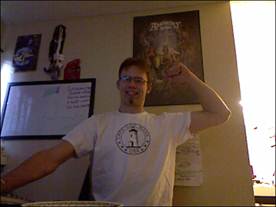
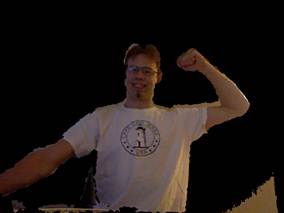
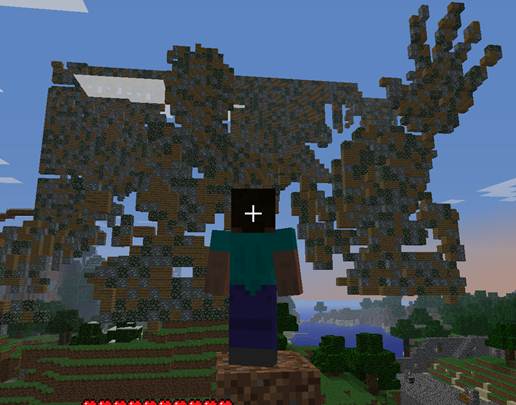
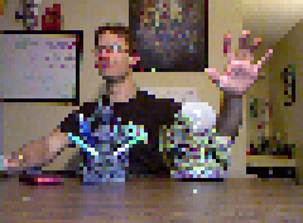
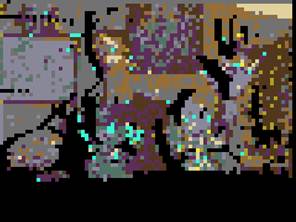
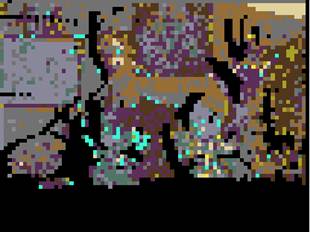
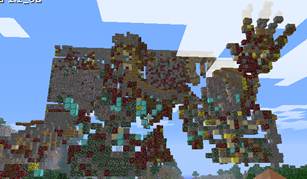
- Results Color Test: (please excuse the shirt!) – 100 blocks per meter
 ->
->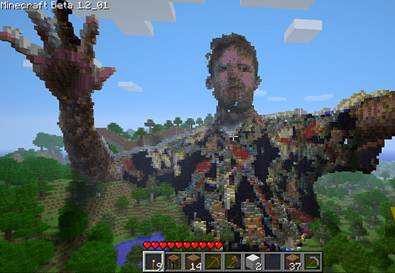
- Color mapped image using RGB representation of blocks:
- I love how my garnet/silver bracelet was turned to a ring of redstone! So cool!
- Getting glass out of the equation as having empty see-through holes isn’t so cool.
- TODO:
- Update RGB manhatten distance equations with CIE-L*ab.
Ready a world for the action
- How to set the stage
- Have to anchor the statues to the ground, and get a point of view as close too the kinects as possible. This will yield the best result in an animation.
- Created a ‘floorBlock’ variable that will anchor the statue to a Y level between 0-127
- Instead of ‘clearing’ the stage as done in processImages.py, lower a world so more room for massive statues is present. The look and feel of the world will be preserved in the background
- Lowering by 30 gives a great effect, while does not slow down the world too much.
- Make it so that the stage always centers, no matter what BlocksPerMeter is set too. This will allow the growing and shrinking of models while retaining a correct POV
- Determine how clouds work as they are an inevitable part of a massive sculpture animation
- My assumption is that they are based off the time element in the Level.dat file.
- Two successive logins to the same world have the clouds in the same position
- Try modifying the time and see if that screws with the cloud position
- If not, try changing chunks and see if that screws with it.. If not, we’re golden!
- If clouds will play nicely, then we do not need to worry about cutting them out, as the quickness of the automated snapshots will make them look like they’re progressing normally
- If clouds don’t play nicely, the Point Of View of the user will have to be positioned in such a way as to
- Build worlds until a good canvas for an animation is found. Maybe something flatish with a mountain in the distance?
- Lowering the world
- In order to have truly monsterously huge statues, the world has to be lowered. Sea level is around 63 on the available 0-127 spread. Lower the entire world…. But how?
- Create a branched version of processImages.py that takes a saved world, iterates through every chunk and lowers the world.
- Go through the block data, take every block above the cutoff and transfer it’s data down Y by 60. Do the same for the skylight, heightmap, and blocklight. That way, other than the world being much taller, noone should ever know that it was lowered!
- http://pepijndevos.nl/where-to-dig-in-minecraft includes an efficient script that grabs every chunk in a world easily using glob. Very clever idea!
- Move each component
- BlockID – Get the index and just update the target. Clear the original if necessary
- Data – has a low and high component to each 4 bit word. Numpy is atomic to bytes, so need functions to split the low and high sections
- Skylight/Blocklight – same as Data
- HeightMap – lower all heights by 60. If lower than 0, set to 0
- First pass looks okay, minus some re-rendering of chunks. Why does this happen?
- Also, maybe bedrock or something should be put at lvl 0 so you wont’ fall through the world while swimming and stuff. This will change some light calculations, but hopefully not bad enough to cause major issues
- Can we clear the entities for each chunk? I have a suspicision that they are causing the re-rendering of select chunks.Mob spawners and chests will not be aligning with the entity data, could be causing problems.
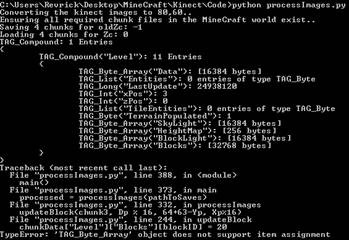
- As we can see from the mc-map render, the chunks were properly lowered, but the logging in respawn death caused the respawn to move and thus the world was expanded
- Created a module to lower the player during the save so they will not fall to their death on login. Hopefully this gets rid of the stuttering and crashing problem seen so far.
- While it makes me not die at login, it crashes not long after loading, even on peaceful.
- Chunk Orientation:
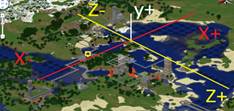
- North is X-, South is X+
- East is Z-, West is Z+
- Set Entities and TileEntities of every chunk to NULL or whatever
- Both Entities and TileEntities are in the chunks [“Level”][“Entities”] and [“Level”][“TileEntities”] areas. When they have data, a TAG_Compound is found, and when they don’t a TAG_Byte is found.
- By just setting them all to TAG_Byte with a value of 0, and saving, should be enough. This is based on the assumption that most things will be brought under the world and trimmed anyway.
- Couldn’t get that to work Scanned the chunks for TAG_Lists where empty, and basically copied them into every chunk. This should be sufficient for ‘clearing’ every entity in the world.
- If this doesn’t work, set the floor to bedrock so entities don’t fall through. That is my gut feeling as to what is happening
- Didn’t wind up doing this, as clearing the entities stopped the crashes! My guess is that entities fell through the world and kept falling.. so the bedrock fix may have worked too, but they the calculations of blocklight would be wrong.. so..
- Turns out if the skylight for air is not set to 15, then new blocks that are added to the air with a skylight of 0 is shaded incorrectly. For now force the top slide of new air from the lowering of the world to have a skylight of 15.
- Anchor the statues
- Instead of anchoring the statues to the top of the world like currently, use the XYZ positioning found from the kinect to have a 1-1 mapping of the world and the 3d region sensed by the kinect. This will make it so that when people or objects move in/out of the Kinects range, the statues will not jitter around as they anchor to the top of the world.
- The ‘PlaySpace’ of the MineCraft world is currently dependant on the width of a single frame. That won’t work, as the various frames will cause a jitter back and forth as their extents change.. choose a real region for the Kinect data to be rendered.
- Use current images to find a good spread (in meters) to use as a working minecraft area
- Hacked up processImages.py to not save anything, but instead find the depth of the ‘players’
- Pic#63 will be good for horizontal spread:
- X [-1.4m to 1.26m] Y[-.88m to 1.0m] Z[1.76m,2.6m] was detected for: 136 pixels across resulting in:

- Reasonably, -1.25m to 1.25m will work well, this results in 2.5m of working area.
- Pic#74 will be good for depth spread:
- X[-1.46,-1.26] Y[-.57m to 1.03m] Z[1.7m to 2.5m] was detected, creating 138px:

- A little closer would probably be better, adjusting to [1.15m to 2.55m] will give a 1.4m working area. This should work well.
- How to anchor Y is the tricky part. We really want the models anchored at the bottom, but that is difficult… as the player moves forward and his legs are cut off from the image, we will lose the information about where his feet hit the ground, giving him the illusion of floating. We will always have 128 blocks vertically to deal with, and it looks like going to about +1.1m or so in the positive will be substantial.
- As the blocks representing the 3D space get bigger, we want the models to orient onto the gorund. Having them float high above isn’t very useful.
- The ‘floor’should be a new variable allowing control over where the Y variable anchors. This will give some flexibility to the user to allow them to try to match up the models with the ground before creating the full stop-action animation.
- The floor will initially be set to -.65m, which is kinda an average of the two images above
- Note: Y is reversed when read in from the kinect. Negative is high, and positive is low. Why, I have no clue.
- Looks good! Chose a floor of .85 as it seems to be decently centered at the bottom so the statues will look like they’re actually standing. As the models are sized, they should continue to be on the ground.
- When the models are scaled via the ‘BlocksPerMeter’ variable, they now anchor correctly on the ground.
- When they are resized, they will get smaller, but stay on the ground!
- Notice it is 128 pixels high, and that is exactly how many blocks of resolution we have to play with for the stop-action!
- Make sure the area is centered for different scales. The ‘center’ chunk can be toggled, and (X:0,Z:0) of this chunk should be the center of the diplay.
- To test, need some way to test. Make it so that the 0,0 coordinate of the initial start chunk is marked with a tower of glass or something.
- Here is a world I created for the movie, that was lowered 40. A glass tower was created in the 0,0 of this chunk, it wil be the center
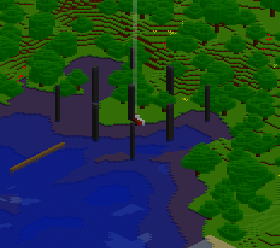
- All corners have a tower of bedrock. Center corner has a tower of glass.
- Make sure block spread is being correctly reported
- Center the projection to always be by the glass.
- Setting the POV
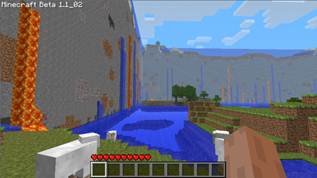
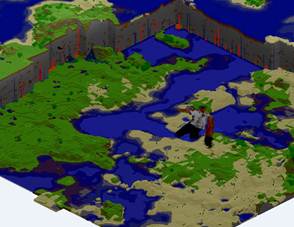
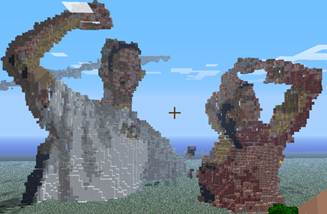
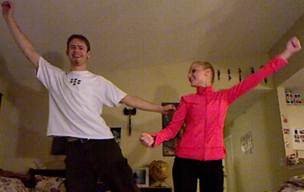
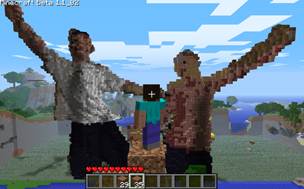
- Save the world to be used as a canvas, and create a copy. Take that copy and import in a statue’d image of two people. The location should be as close as possible to the Kinects location relative to the actors in the real world, for best effect.
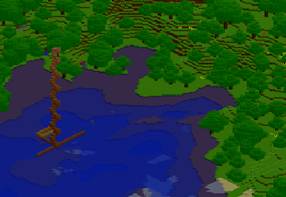
- Created world until one with water in the front, flat area behind it, with a mountain in back was found.. took 3 tries.
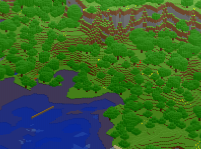
- The wooden linein the water is the line that represents the Line of Sight of the Kinect
- Find a good center for the statues, remember the chunk orientation (bottom left of the image is North)
- Create a ledge with layers so the vantage can be raised/lowered when the scale changes
- The player in these cases is pointing directly south. Extract the players rotation information and see what it is set too when facing south.
- The specification states Rotation is a list of 2 floats that represent the yaw and pitch respectively. West is 0.
- Using twoolies NBTFile parser, can access the Yaw, and set to due south by:
- nb["Data"]["Player"]["Rotation"].tags[0].value = 270
- To test the Point of View, manually created different size versions of the same image to check for centering and jitterness.
- Used Picasion to create an animated gif
- Considering it a success!
Automate the World Building Process of Each Frame
- This is the meat of the project. We have many images read to be transformed into many worlds which in turn will turn into many snapshots which can be stop-actioned. While this *can* be done manually, it would take a very long time, and creating a smooth stop motion animation would be tedious and time consuming. What ever can we do about this? How much of it can be automated using Python?
- Overview - For each frame:
- Save the pre-edited chunks so we can revert after the frame is rendered in the world
- Save the players position, pitch, and yaw so that even if it moves somehow for one frame, it will not effect successive frames
- Take the particular RGB and Disparity images from the Kinect and process them into the world using processImages.py
- Take the screenshot
- Revert the world back by taking replacing all edited chunks with their originals
- Breaking up the scripts:
- Both the main scripts have to be tweaked so they can be imported and called from a controller script. Both have to utilize main, and be able to pass in the variables that can change.
- ProcessImages.py variables
- worldPath of the save
- savedZipName of the zip file to save the pre-edited chunks too
- name of the image that is being processed
- RestoreWorld.py variables
- worldPath of the save
- savesZipName of the zip file with the pre-edited chunks
- Now that the scripts can be called seperately, create a new script, driverAnimation.py, to handle the outer layer of the frame rendering.
- driverAnimation.py:
- With minecraft open:
- Go to a designated directory with all the images, and create a list of all the .png,.tiff image pairs
- Extract the player position, pitch, and yaw so that it will be consistent for every frame
- Extract the world time (or just set it to near-dawn) so that it is bright and lots of time can expire until dark
- Render the world for the specific .png, .tiff pair
- Move focus to minecraft
- Some info on focus here: On Windows, you can use the pywin32 modules to assist you. There's a sub-module in them called win32gui that has a SetForegroundWindow method. I usually use win32gui.EnumWindows() to loop through all the open processes and then use both win32gui.ShowWindow() and win32gui.SetForegroundWindow() to make the window I want appear.
- Instally pywin32-214.win32-py2.7.exe
- Documentation of what it looks like I need to do is at: win32gui.html
- Set window size so images are 720x480
- Anchor to top left of screen so mouse clicking is easier
- Using window positioning, move to ‘Singleplayer’ button
- Good StackOverflow example here
- Used Mspaint to find coordinate of 364x266 as the center of the ‘SinglePlayer’ button
- Navigate to ‘World2’ as that is my super special test world
- Click!
- Wait a designated amount of time
- F2 for the screenshot
- Esc to exit to the menu screen
- Click on ‘Save and quit to title’
- Restore the world to it’s previous glory
- Increment the world timer by a small amount so clouds will appear to move
Create a stop-motion animation
- Capture a Choosing an Application
- Windows Movie Maker has a stop-motion option up to 1/8th of a second. Need a higher FPS.
- Have a MAGIX Movie Edit Pro 11 license
- When importing many still frames as 1-frame components, many blanks are inserted. This required manual fixing which is not fun for lots of frames.
- VirtualDub allows for quick importing of many incrementing images.
- Minecraft default size is 854x480. How close is this to the various video options?
- Hatching a plan
- Import the screenshots into VirtualDub 1.9.11 to create a .avi.
- Open VirtualDub.exe
- File->Open Video File…
- Select the first image in the series. Tested this out using the .PNG captures from the Kinect and got an 00000OutputColor.avi that mashed all the frames together
- Import this .avi into MEP
- All snapshots are imported as one frame, with no blanks!
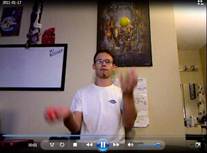
- Result: (click to see wmv created from Kinect stills)
- Creating the movie
- Import all the stills made from the script into VirtualDub
- Import the VirtualDub .avi into MEP
- Create the a 3.3 second 100 frame test movie of my crappy juggling skills
Add Effects
- Now that the stop motion is technically complete, it could be uploaded as is. However, it would look more polished if there was sound, effects, or something else to really make it stand out. Some ideas are:
- Music:
- Use something un-licensed so that soulless lawyers don’t try to take my BlackBerry shirt from me
- Something that goes along with the animation would be good
- Craig Viniconis may be a good resource, as he spends a good chunk of his time writing and playing music
- Effects:
- Multiple stop-actions can be stitched together. They should be of different scenes, and have different actors, to really show the versitility of the application.
- This will only be realistic if a majority of the steps to create the stop action can be automated, otherwise it would be tedious and noone (minus people I paid) would do it!
- Maybe start with presentations of the familiar images of the first project, then have one move! That should cause some excitement.
- Try to come up with more!
- Motion capture setting/plot
- Can try hacky sacking or juggling. Both of these should create cool effects.
- Get girls. Everyone likes girls.
- Colorful and fun
- Idea: Anything you intersect with effects future frames by removing the block from the world.
- Say I’m swinging a sword and it cuts through a house. The first world rendered where there is an intersection of old block->new block, the position and chunk are remembered. Then, after the old world saves are loaded, the intersected ones are cleared and turned to air.
- This could give some cool effects, like walking through a mountain, punching houses, etc.
- Could also have an ‘add’ mode, where blocks of a certain color leave a trail and replace the original air with some other type of block.
From Phase 1:
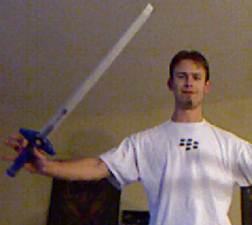
1. Me holding a mighty nerf weapon (1cm^3):
a.
 ->
->
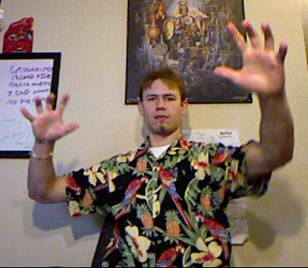
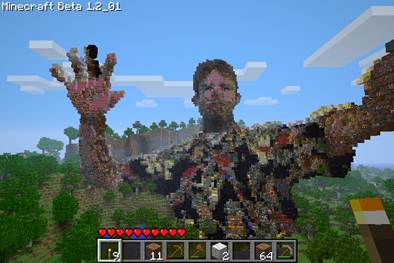
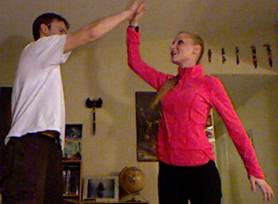
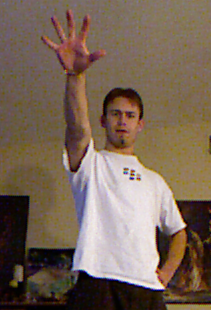
2. High-Five:
a.
 ->
->
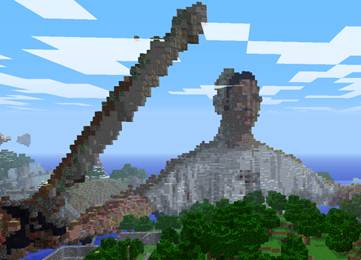
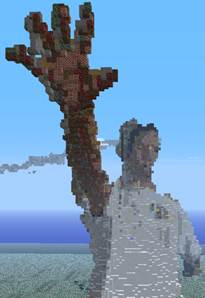
3. Reaching forward:
a.
 ->
->
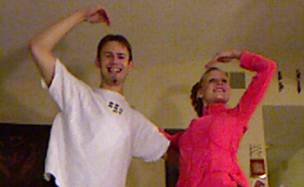
4. With the girl:
a.
 ->
->
b.
 ->
->
5. Playing around with background filters:
a.
 ->
->
· Taking the snapshots:
o This script takes a X ‘snapshots’ every Y seconds from the kinect and saves each ‘snapshot’ as a series of two images
§ OutputColor.png – RGB color image from the Kinect Camera
§ OutputDepth.tiff – 12 bit disparity information from the Kinect Depth Camera (note: it will look black if opened with a normal viewer)
o Dependencies:
§ Python 2.5 or higher
§ Python Imaging Library (PIL)
§ The Kinect must be connected to the PC, and the drivers from http://codelaboratories.com/forums/viewthread/442/ must be installed
o The Script:
§ http://www.orderofevents.com/MineCraft/getSnapshot.py
o Global Variables:
§ Image names: A five digit index 00000->00001->etc will be prepended to each image
§ numImages: The number of images to be taken, one after another
§ imageWait: The number of seconds between each image taken
· Inserting a snapshot into a minecraft save:
o This script takes a color and depth image from getSnapshot.py and pushes them into a minecraft save. The statue is anchored to the top of the world by default. The depth and spread of the area is determined by the area of the 3D image capture from the Kinect
§ When testing, set testEdit to True. This will prevent the save from happening, and the mapImage.png file can be checked for results.
o Dependencies:
§ Images from getSnapshot.py
§ Python 2.5 or higher
§ NBT parser from https://github.com/twoolie/NBT
§ MineCraft
§ PIL and numpy Python libraries
o The Script:
§ http://www.orderofevents.com/MineCraft/processImages.py
o Global Variables:
§ Verbose: Set to true to show logging on the console
§ testEdit: When true, nothing is actually saved to the minecraft save. Instead, an image “mapImage.png” is created to show a cutout of what will be saved projected in 2D
§ colorMatch: When true, the various colors of the 3D image are mapped. Currently uses a manhatten distance RGB algorithm.
· If false, will create statues out of randomized smooth stone, cobblestone, and mossy cobblestone
§ ImageNames: the depth and color image from getSnapshot.py that will be processed
§ pathToSaves: The absolute path to the minecraft save file
§ minmaxDepth: This can be toggled to exclude regions outside these bounds. The background walls, or close static can be removed by toggling these values.
§ blocksPerMeter: When set to 100, each block will represent 1cm^3. Can toggle this to shrink or grow models.
§ startChunksX,Z: where the image should be inserted into the world.
· Note: All the modified chunks must exist prior to the save
§ Additive: False if blocks should be ‘cleared’ prior to the model insertion.
§ Floorlevel: How deep to clear the chunks too if Additive is set to False
§ FloorType: The type of block to put at the bottom of the cleared chunk
§ PossibleBlocks: A list of all the blocks that can be color matched. The name, ID, and associated RGB values that represent the block. Current values were chosen by sampling the various textures from terrain.png
Get a color and depth Kinect data saved as files
· Found a Python and C# project at: http://codelaboratories.com/forums/viewthread/416/
o The python:
§ Does not appear to work.
§ With .dll in the proper directory, get a Windows Error when reading the memory
§ Run as administrator?
o The C#: CLNUIDeviceTest.sln
§ Works in Visual Studio 2008
§ If it crashes, the USB controller gets overloaded until a reboot.
§ Takes ~15fps of the color/depth information
· The real next step is to determine which approach to take. One of the two:
o Get the python working, keep tweaking the system/dll locations/installs/drivers until it works and you can read out an image..
o Modify the C# to save out a file using the data that it is correctly getting really quickly. This will require looking into the APIs and figuring out where I can sneak in to take the snapshots.
· Decided on an approach: Modifty the UI of the MainWindow in C# to include a button that, when clicked, saves the two feeds to files.
o After trying and failing in many efficient ways to save a BMP, a brute-force and slow method was created.
§ A button is added to the GUI
§ When pressed, ARGB copies of the two camera streams are saved
§ These int[] are converted to byte[]
§ The byte[] is used to set colors that set data in a Bitmap
§ The Bitmap is saved to the output location, overwriting the previous
· After looking at some images, the RGB data was seen to be slightly green tinted. Reworked the algorithms, made it much smaller, and not it appears to work as intended. Go me!
A problem of non-conformance is readily apparent. The RGB colormap that is supplied with the drivers must some some algorithm to determine what color to turn the various pieces of the scene into.
By asking for the Corrected8 data instead of the raw data, it seems that we now get values we can scale as desired in the minecraft world. Sadly, there is a problem with alignment.
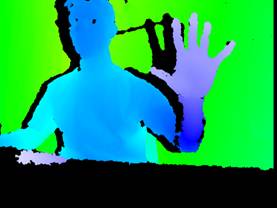
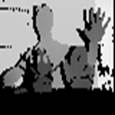
Examples of the grayscaled output is:
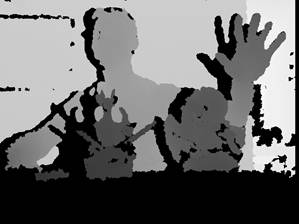
Here, Black signifies nothing, and the darker you get the closer you get to the sensor. Infinite background stuff will be white.
It appears a shift to the right and up may be enough to account for the alignment issue, but we can explore then when we try to colorize our blocks (phase 2)
Info:
· Post describing updates in order to get raw depth data: http://codelaboratories.com/forums/viewthread/416/P15/#1448
· Post asking how to use depth information, hints that it may be non-linear and compressed on-board: http://codelaboratories.com/forums/viewthread/425/
· Project that maps kinect data to a 3D point cloud (awesome): http://nkinect.codeplex.com/
· In order to “quad warp / rectify” the images:
http://groups.google.com/group/openni-dev/browse_thread/thread/b73cc93a11b501c4
Now, to ‘quad warp’ the images to we get the correct RGB pixel for a depth pixel
· Since the two images are taken from two different cameras, they do not share a viewpoint. In order to be able to know which RGB pixel relates to which Depth pixel, some math will be involved
· Kinect inner workings and complex equation for rectification explained here
· Camera 3d reconstruction explained here
Some Kinect calibration research is done here:
· To get Depth from Disparity:
· float raw_depth_to_meters(int raw_depth)
· {
· if (raw_depth < 2047)
· {
· return 1.0 / (raw_depth * -0.0030711016 + 3.3309495161);
· }
· return 0;
· }
· Equations to map the depth to a RGB pixel
o The first step is to undistort rgb and depth images using the estimated distortion coefficients. Then, using the depth camera intrinsics, each pixel (x_d,y_d) of the depth camera can be projected to metric 3D space using the following formula:
o P3D.x = (x_d - cx_d) * depth(x_d,y_d) / fx_d
o P3D.y = (y_d - cy_d) * depth(x_d,y_d) / fy_d
o P3D.z = depth(x,y)
o Where:
§ cx_d 3.3930780975300314e+02
§ cy_d 2.4273913761751615e+02
§ fx_d 5.9421434211923247e+02
§ fy_d 5.9104053696870778e+02
o We can then reproject each 3D point on the color image and get its color:
§ P3D' = R.P3D + T
§ P2D_rgb.x = (P3D'.x * fx_rgb / P3D'.z) + cx_rgb
§ P2D_rgb.y = (P3D'.y * fy_rgb / P3D'.z) + cy_rgb
o Where:
§ fx_rgb 5.2921508098293293e+02
§ fy_rgb 5.2556393630057437e+02
§ cx_rgb 3.2894272028759258e+02
§ cy_rgb 2.6748068171871557e+02
§ R
§ [ 9.9984628826577793e-01, 1.2635359098409581e-03,
§ -1.7487233004436643e-02, -1.4779096108364480e-03,
§ 9.9992385683542895e-01, -1.2251380107679535e-02,
§ 1.7470421412464927e-02, 1.2275341476520762e-02,
§ 9.9977202419716948e-01 ]
§ T
§ [ 1.9985242312092553e-02, -7.4423738761617583e-04,
§ -1.0916736334336222e-02 ]
§
o In order for this to work, valid depth data is needed. Going to need to get the raw disperity information
Coding the transforms
o Now that all the formulas and constants are known, it has to be coded up
§ Done!
o First test is to take a depth and color image
§ 
§ Depth image is all black due to 0-2048 data per pixel
o Now play around with the parameters to figure out what X,Y,Z spreads are required
§ Created a new python script to limit various pixels of the depth image to their RGB counterpart, and then trim select regions. After some toying around with the parameters, got the resulting image:
§ 
Open up a minecraft world save file
In order to “open” minecraft save files, an understanding of the save-format is needed. There are a few different formats that minecraft has used throughout it’s life, but the latest is the alpha format described here: http://www.minecraftwiki.net/wiki/Alpha_Level_Format
Some tidbits of knowledge are as follows:
· The terrain is split into 16x16x128 chunks and saved into their own files
· The world folder can have 64 subdirectories, which can each contain 64 subdirectories
· Each chunk is identified by it’s xPos and zPos.
o The chunks name is created by base36ing xPos and zPos.
o The names of the folders are found by taking xPos and zPos, modulo 64, and converting to base36
o Ex: to find the cunk at position (-13, 44)
§ The first folder name is base36(-13 % 64). This is base36(51) which is "1f".
§ The second folder name is base36(44 % 64). This is base36(44) which is "18".
§ The chunk file's name is "c." + base36(-13) + "." + base36(44) + ".dat". This evaluates to "c.-d.18.dat"
§ Thus, the chunk at (-13, 44) is stored in "1f/18/c.-d.18.dat"
· Level.dat stores environmental data like time of day, health, inventory, etc
· There are 128x16x16 (32768) blocks per chunk
· There are many bits of light optimization (skylight, blocklight, heightmap)
· Block format:
o Blocks are laid out in sets of vertical columns, rows go E->W, columns go N->S
o unsigned char BlockID = Blocks[ y + ( z * ChunkSizeY(=128) + ( x * ChunkSizeY(=128) * ChunkSizeZ(=16) ) ) ];
§ Simple: char BlockID = Blocks[ y + ( z * 128 + ( x * 128 * 16) ) ]
o X increases south, decreases north
o Y increased upwards, decreases downwards
o Z increases West, decreases East
Now that we have some knowledge of the format, lets fill in some pieces.
· Calculating base36(int)
o World.py from overviewer does a good job with having a small simple python script for converting to base36. Use theirs!
· Scale:
o Since the minecraft world is only 128 high, a 480 high depth map may not work… So lets scale by 1/8th. This will turn a 640x480 to a 80x60.
§ Sampling for now, but turn to an average if required
o PIL library data is here:
§ http://www.pythonware.com/library/pil/handbook/introduction.htm
Determine orientation of save so a world render will show the image
Now that we have the data, we have to process is so that the image will properly align in the minecraft universe so that renders of the world, with N to the Bottom Left, will see the image created from the Kinect data.
· Determine the area of drawing. How deep should these images be?
o 80x60x64 seems decent.
o 0-255 grayscale to 0-64 grayscale via sampling
· What chunks will be effected?
o We want it starting at 0,0 for ease of math reasons
o 5 chunks will spread in the E->W direction, so the following chunks will be the ‘z-axis’ of the image
§ 0,0 0,1 0,2 0,3 0,4
o It will go 4 chunks deep in the N->S direction
§ 0,0 -1,0 -2,0 -3,0
o Overall spread is [-3,0]->[0,4]
· Orientation
o Turn the normal NSEW 90deg counterclockwise
§ EW is Z axis (E)(Z-)
§ |
§ NS is X axis. (N)(X+) ------------(X-) (S)
§ |######
§ |######
§ |######
§ EW is Z axis (W)(Z+)
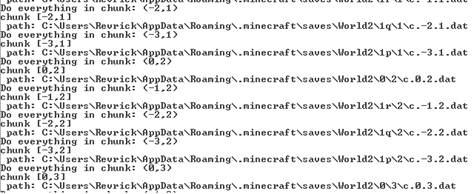
· Calculate which chunks actually have to be opened
o Created a python function that translates the required chunks into the paths it should exist in.
§ 
· Orientation:
o X increases South, decreases North
o Y increases upwards, decreases downwards
o Z increases West, decreases East
o 
o This is 0,0:
o 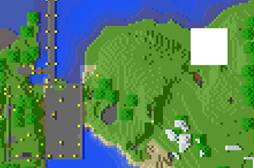
· An NBTFile example can be found at:
o http://pepijndevos.nl/where-to-dig-in-minecraft
o https://github.com/l0b0/mian/blob/master/mian/mian.py
We are now able to dig into an individual chunk save and attempt to modify the blocks within.
A summary seems to be at: http://www.minecraft.net/docs/NBT.txt
Time to get one chunk, (0,0), updated..
· Open the .dat file
· Un-gzip it
o http://docs.python.org/library/zipfile.html
o http://code.activestate.com/recipes/148292-controlling-gzipped-io/
o http://www.minecraftforum.net/viewtopic.php?f=25&t=24585
o https://github.com/twoolie/NBT
§ Downloaded the source and ran python setup.py install, library should be installed
· Find the appropriate blocks, update them to obsidian or something obvious
o The format is specified as:
§ http://www.minecraftwiki.net/wiki/Alpha_Level_Format/Chunk_File_Format
· After all the data is read in, ungzipped, the TAG_ structures have to be parsed so we can edit the appropriate part of the file
o Probably not order-dependant.
§ Find a way to find the position, name, and size
o 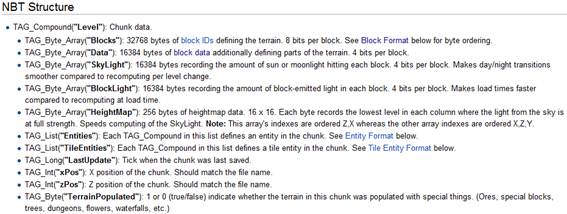
o With the NBT package installed,
· Update heightmap, skymap
The overall flow of the save will be:
· Open and Scale Kinect images
· Check Minecraft Save and Open
· For each X in the width of the image, 0->79
o Every 16 pixels:
§ Save old strip of chunks if loaded
§ Load the strip of chunks coorelating to next 16 horz pixels
o For each Y in the height of the image, 0->59
§ Read depth
§ Calculate chunk XZ
§ Calculate Block XYZ
§ Update chunk data
Attempt a NBTFile creation file from:
Preliminary “in the world” save:
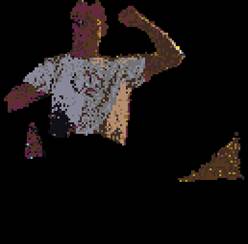
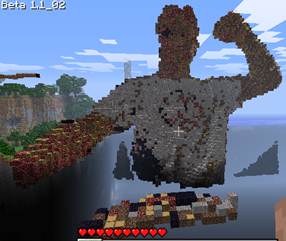
Note: This is saving basic information. Every XY point in the image had it’s disparity found and a Z was calculated. This is just a projection into 3D rather than a true 3D image. It was based off a scaled depth map from the kinect(image 1), and originally turned to a glass sculpture(image2) and then as a stone/wood statue(image3)
 ->
-> 
In order to get the color data from the color image to match an existing block we need to get a color approximation for each possible block that can be used.
· The terrain.png as of 12/29/2010 from MineCraft Beta.
o 16x16 Originals 2x2 pixel average via MS Paint
o 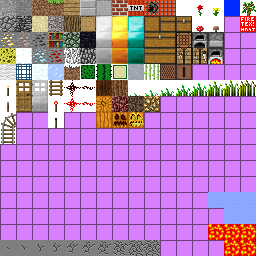 ->
-> 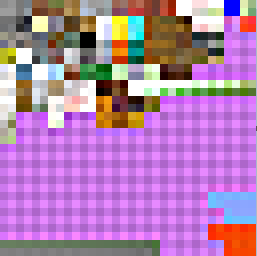
o If 1/2ed in MS paint 3 times, we’ll get 2x2 pixel approximations of each texture
§ Can pick and choose which of the approximations match the best
FLow:
· Look through the blocks and pick the ones that can be used, then look through the ‘can be used’ and trim ‘will be used’
o Be careful of data that has to effect other blocks
§ Solid/not solid
§ Data (for torch rotation, etc)
§ Flows
§ Light (recalcing lightmap will be necessary)
o Block data can be found at: http://www.minecraftwiki.net/wiki/Alpha_Level_Format/Chunk_File_Format#Entity_Format
§ Known TileEntity ids(skip for now): Furnace, Sign, MobSpawner, Chest
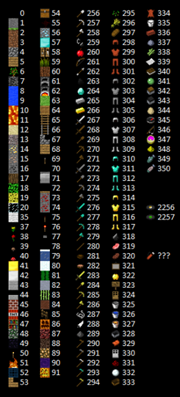
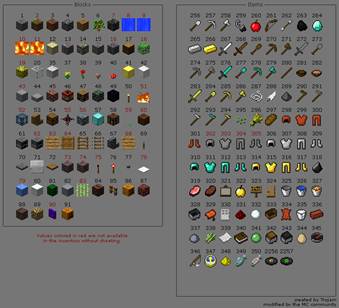
o ID data can be found here and here:
·
· Data for blocks can be: (4 bits per block – same index as blockID)
o 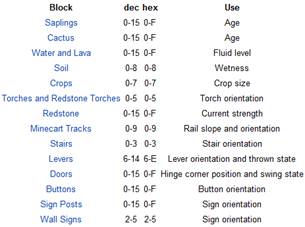
§ If these are saved incorrectly, or become incorrect by updating a blockID that had a value that is now invalid, there can be crashes. This data should be set imediately after setting a new block in a pos.
o Pumpkins: 0123 for ESWN
§ North (3) or East(0) can be used to give an additional block of color
o Torches: 1234 for SNWE, 5 is standing
o
· Lets start with 4 basic colors for the blocks and get the algorithm working
o Smooth stone
§ BlockID 1, HSL(0,1,115)
o Wooden Plank
§ BlockID 5, HSL(25,119,103)
o Diamond
§ BlockID 57, HSL(120, 240, 152)
o Sand
§ BlockID 12, HSL(33,136,192)
· Create color different algorithim
o Initial: .5dist(H) + .3dist(L) + .2dist(S)
· Then add access to the Data for each block
o Then recalc Data while adding blocks. Parallel to “Blocks”
· The dividing of the depth data by 4 is losing too much resolution. Turning it into a 64 spread
First attempt at color matching using straight HLS distance:
Changed HLS to be 50,30,20 weight:
· Adding more colors:
o Use multiple HLS’s for each block. Start with 1 each, then add other tints you want that block to represent
o Print a pallett out so you can see the possible colors being used
o
Refine the colors!
o Turn this into a minecraft save:
§ Instead of going through every X and Y pixel of the depth image, and looking for its cooresponding depth, the projection points from the above formula are used.
· For every X,Y of the image, determine its depth from the disparity
· Determine it’s 3D X,Y,Z position in space in meters
· Re-project onto the RGB to get the color of the particular pixel
· Map to blocks in the minecraft space
· Find the type for the RGB and change the block
· Save the file
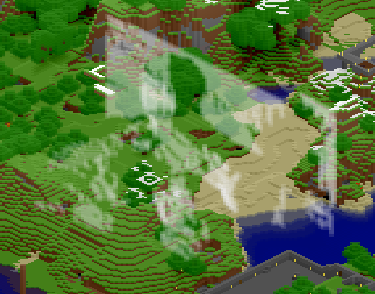
o First working attempt, Color mapping data (in real 3D X,Y coords – newer overwrite Z) and MC:
§ 
§  ->
->
It is annoying to load a world that is night. Modify the world after the save to set it to noon.
Level.dat file format contains the time of day, it’s format can be found here
o TAG_Long("Time"): Stores the current "time of day" in ticks. There are 20 ticks per real-life second, and 24000 ticks per Minecraft day, making the day length 20 minutes. 0 appears to be sunrise, 12000 sunset and 24000 sunrise again.
o Set it to 12000 and the sun was going down
o Set to 18000 and it was night!
· Creating a heightmap
o Every chunk that is cleared and saved should have it’s heightmap recalculated. This is required in order for the blocklight and skylight to be calculated correctly
TODO: Calculate the skylight and the blocklight
-easy enough